
Gibson Epiphone Junior model Electric Guitars
Step One
We'll make use of an Epiphone Les Paul as our example. Invigorate your memory regarding settings. Taking a look at the guitar held in playing place, the utmost effective row of knobs would be the amount and tone controls the rhythm (neck) pickup. The knob closest to your throat is the volume control. The reduced line of knobs controls the volume and tone for the treble (bridge) pickup. Very first take away the strings, bridge, and tailpiece.
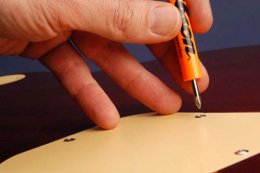
Step 2
Then place the guitar face down on a non-scratching area and remove the trunk dish behind the knobs. Cannot you will need to make use of the wrong measurements of screwdriver, might remove the screws and have now a negative day. Keep the round dish alone, which is just for the toggle switch, which we're perhaps not changing.
3
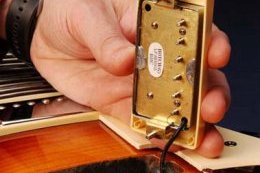
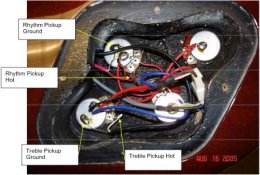 When the back-plate is removed, you really need to see something like this (see picture). For those who have an electronic digital digital camera, simply take a photo for the open cavity for future guide. The amount pots-the people we will get worried with here-are both regarding left, rhythm pickup above and treble pickup in the bottom. Regarding rhythm pickup amount pot, there ought to be a red wire using guard connected to the back associated with cooking pot additionally the inside attached to the very first lug on the bottom associated with pot. There was an identical arrangement regarding the treble pickup amount cooking pot except the cable is black colored. (The colors may vary depending on the electric guitar you're taking care of. The hot-wire is the one connected to the lug.) They are the pickup connections.
Step Four
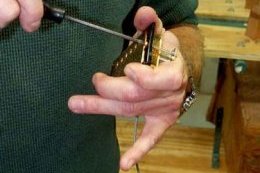
Carefully unsolder and remove these wires. Don't cut the cables, just touch the soldering metal to your solder joint while extremely gently pulling regarding cable. The line should come down when the solder melts away. Keep the blobs of solder on the backs for the containers. If there is sufficient here, you'll not need to use additional solder later.
 Step 5
After the pickup leads are free, flip the guitar right back over, take away the four corner screws from the pickup bezel.
Action 6
Lift the entire pickup set up out. Grasp the pickup lead and gently pull it through tunnel in your body, entirely releasing the pickup from the instrument.
Action 7
Take away the pickup through the bezel by firmly taking out the two spring-loaded screws on the side.
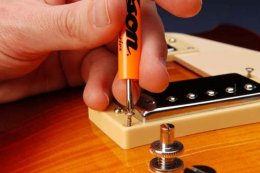
Action 8
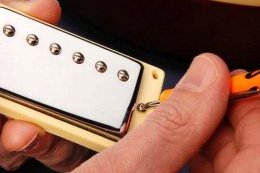
Mount the newest pickup into the bezel by reversing the procedure utilizing the new screws that was included with your pickup. Utilizing the spring stress onto it, threading the latest screw within the pickup is a little difficult, but with perseverance you'll get it.
Action 9
Thread the newest pickup cable through the tunnel towards pot cavity. Slice the new pickup cable to your amount of the old pickup cable or coil it neatly inside cooking pot hole. All of that's remaining doing now's to remove and prepare the latest leads and solder them set up the same way the old people had been. Use your image as a reference. (You did just take a picture, didn't you?)
Action 10A: Vintage two-conductor wiring
Gibson '57 Vintage, '57 Vintage Plus, P-90, and P-100 pickups all feature classic two-conductor wiring. These pickups are very an easy task to put in. Body straight back the guard (wire mesh) to reveal the hot lead cable. Remove the termination of the hot-wire back 1/8" making use of your line stripper or a razor knife. "Tin" the line by holding the tip regarding the soldering metal into exposed lead line and applying only a little solder to drench among the strands. Never make an effort to skip this step, it makes the remainder work easier.
Share this article
Related Posts


Latest Posts


