February 6, 2024

Changing Electric Guitar Strings
Measures
Part 1
The Removal Of The Strings And Bridge Pins- Determine how to restring. There's much debate about whether it's a good idea to replace every sequence individually, or simply just to unstring everything then restring all of it at a time. The decision is yours concerning which way to use.
- Making use of the one-at-a-time strategy, you continue the majority of the stress the neck can be used to therefore hold string stress in balance with truss rod tension.
- Getting rid of all of the strings simultaneously lets you clean and wipe the fingerboard without raising up the strings or being forced to work around them. Fingerboards accumulate a variety of skin oil, skin and dirt (which saps tone and acoustic sustain from the electric guitar).
- Remove the strings. Loosen the strings until these are generally no more under tension. Then, either video them utilizing nippers or still loosen all of them through the tuning devices until they could be drawn out of the tuning pegs.
- A relatively inexpensive tool labeled as a peg winder, offered by any music/guitar store, is extremely convenient for this.
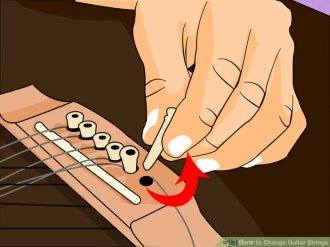
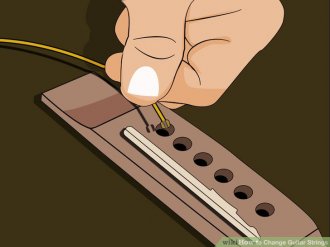
- Get rid of the connection pins. They are the knob-looking things (usually white or black) that enable the strings to hook themselves on the inside of the guitar. Use a bridge pin puller, which is available in many varieties consequently they are offered at any music/guitar store. Bridge pins can be quite stubborn, especially if either they or even the electric guitar is brand new. Occasionally you may well be tempted to grab these through the outside with pliers. While this is acceptable if done with the utmost care, it's usually not essential.
- Another strategy is to press the pins from in the guitar, utilizing a tough item such as a coin. Pushing the sequence more in to the electric guitar as you do that often helps since the end of the sequence is wound and "wedges" it self in using peg. Once the pegs pop free you'll pull them out from the peg holes.
- Remove the strings through the peg holes one-by-one.
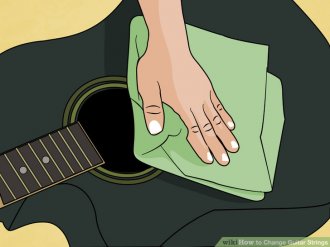
- Clean your guitar, if desired. This comprises washing the human anatomy, fingerboard, straight back of the neck, and headstock. Use a significant cleanser from a guitar or songs shop if at all possible. Never use furnishings polish, glass spray or other typical household cleaners. If absolutely nothing else, merely make use of a somewhat dampened chamois cloth or lint-free cotton fabric. Natural oils from your own hands will establish in the fingerboard of this electric guitar with remarkable rate causing a thick gunk.
- In the event that you must use liquid, you really need to use such a minuscule number of water on cloth as you are able to scarcely tell it really is wet. Extra water can destroy unsealed lumber.
 Part 2
- Get your brand-new strings prepared. Some strings' baseball finishes are color-coded to point what note these are typically to-be tuned to.
- Select your personal purchase. There are numerous ideas about what order strings is applied. Some guitarists begin during the thin end and work their particular way-up, or start in the dense end and work their particular way down.
- The most popular strategy is to first place in the thinnest sequence, then the thickest, then alternate towards the next-thinnest, then your next-thickest an such like (1, 6, 2, 5, 3, 4). Alternating within manner keeps a more even left-to-right pull on the throat and makes later tuning less problematic, specifically for older guitars.
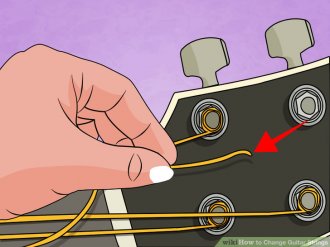
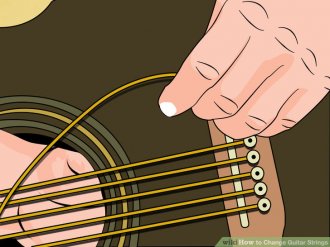
- Insert the knob end of string in to the peg opening and re-insert the finish peg. You need to be keeping when you look at the string during this period. It's helpful to pull somewhat stress in the sequence toward the pinnacle of the electric guitar as this stress is what keeps those pegs from falling out.
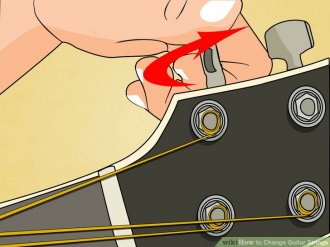
- Stretch each string. Once each sequence is within its peg opening, extend it up to its appropriate tuning peg and insert the conclusion through opening in peg. Keep in mind that you should be turning a guitar tuning key ALWAYS OFF TO THE RIGHT to tighten. If tuning keys on your own guitar take reverse sides of the head (as it is normal), you bring the sequence up between the two rows of crucial pegs and also to the exterior.
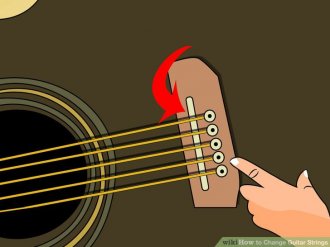
- Thread the sequence through the hole and pull tight. You will need to leave just a little little bit of slack to have some excess string to breeze across the tuning pegs. If you fail to, could run out of string prematurely and strings will loosen up if you're playing.
- That is, regrettably, a trial-and-error procedure and it is different for every sequence. Just remember, you can always cut-off much more if you leave in excess. It is possible to never ever include straight back that which you cut-off.
- Bend the sequence up (90° perpendicular into the guitar) and change the tuning secret so you get several winds across the peg. This may just take a large amount of winding (again, the peg winder is very convenient for this part). Ensure that once you tighten the sequence that every subsequent wind stacks one below the last, to ensure none of winds overlap. This ensures both a cleaner searching wind and an extended life to the string itself, as well practicing the guitar itself residing in track.
- Try not to tighten up the string to its usual pitch, but rather some semi-tones below.
 you need it tight enough to hold in position and put adequate tension in the bottom peg not to come out once more, the good news is isn't the time for "tuning".
- Try not to tighten up the string to its usual pitch, but rather some semi-tones below.
- Continue doing this treatment with the rest associated with strings.
- Use some wire cutters to snip down extra string, making just about 1/8 of an inches (1/2 centimeter) of "stub". Cutting the sequence too short makes the "stub" end slip back in the spooled sequence and loosen your strings.
- This is applicable simply to traditional nylon strings which wind in this manner. Dismiss this for metallic sequence guitar.
Community Q&A
Include New Matter
- If I cannot purchase that sort of string or I can't find it, so what can i personally use alternatively?
wikiHow factor
Use acoustic strings for a classical guitar and electric strings for an electric powered guitar-there actually are no-good substitutes. Examine e-bay for less expensive string options.
Ask a concern
If this question (or a similar one) is answered twice within part, kindly just click here to let united states understand.
Tips
- After altering electric guitar strings, you will need to tune it more regularly for some time.
- In the event your connection pins have become stubborn, it is possible to cover the prospective pin with a cloth and then try to pull it with pliers. This prevents your bridge pin from appearing like it got ran over from repeated drawing of pliers.
- Eliminate cutting the strings by quickly pulling the excess string with a choose. Support the string between your thumb and a pick which rests from the reduced an element of the first hand and pull quickly. The string will curl and won't need cutting.
- Another useful tip for the removal of the pins is to try using a little tsp. Sleep the bottom of the spoon in the connection for control, using the tip associated with spoon during the side of the pin. Apply a small amount of stress upon the handle to raise the pin-up. It is possible to slip the end of a terry cloth rag between your bridge and spoon if you want to be very careful.
- To achieve the proper level of extra sequence for winding around each peg mind, it is possible to insert four fingers amongst the fret board and also the string being put in at twelfth fret.
- Another means for getting rid of bridge pins involves the utilization of a vintage, round shoelace. Form a loop using the shoelace and place it all over pin. Verify it suits between the pin and also the bridge and tighten up the loop by pulling from both ends. With some perseverance, the pin will come down minus the harm that connection pin removers causes.
Share this article
Related Posts


Latest Posts


